- Joined
- Sep 30, 2017
- Messages
- 7
- Reaction score
- 7
Theres no offical up to date guide on the 3CX website for Fortinet devices. I decicded to help out and make this guide myself based on the 6.0.x FortiGate firmware. Hope it helps people.
Configuring a FortiGate 80F Firewall with 3CX
Step 1: Disable SIP ALG and Session Helper
Step 2: Change the default SIP-ALG Mode
Step 3: Reboot
Step 4: IP Pool
Step 5: Create Inside to Outside Policies
Step 6: Create VIP Object ( port address translation rule object )
Step 7: Create Service Objects
Step 8: Create Outside to Inside Polices
Step 9: Validating Your Setup
Step 1: Disable SIP ALG and Remove the Session Helper
Step 2: Change the default SIP-ALG Mode
The following commands describe how to configure an IP Pool when 3CX is not sharing the same public IP address as assigned to the wan facing interface, such as wan1 / wan2. Often this configuration is required when 3CX has a dedicated public IP address inside a block of addresses from your ISP. By comparison if 3CX is accessing the internet with nat on the same public IP address as the rest of the client network, then IP Pool is not required.
Step 6: Create VIP Object ( port address translation rule object )
Step 7: Create Service Objects
From the FortiGate GUI, we will navigate to the services table.
Step 8: Create Outside to Inside Polices
Step 9: Validating Your Setup
Log into your 3CX Management Console → Dashboard → Firewall and run the 3CX Firewall Checker. This will validate if your firewall has been configured correctly.
Configuring a FortiGate 80F Firewall with 3CX
Step 1: Disable SIP ALG and Session Helper
Step 2: Change the default SIP-ALG Mode
Step 3: Reboot
Step 4: IP Pool
Step 5: Create Inside to Outside Policies
Step 6: Create VIP Object ( port address translation rule object )
Step 7: Create Service Objects
Step 8: Create Outside to Inside Polices
Step 9: Validating Your Setup
Step 1: Disable SIP ALG and Remove the Session Helper
- Open the FortiGate CLI from the dashboard.
- Enter the following commands in FortiGate’s CLI:
config system settings
 set sip-expectation disable
 set sip-nat-trace disable
 end
3. Reopen the FortiGate CLI and enter the following commands below,
config system session-helper
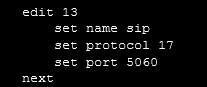
show4. Search for and verify entry 13 says SIP like below… usually is the case.
5. Delete entry 13 with the below command only if item 13 matches the same name, protocol and port as shown in the previous example.
delete 13
endStep 2: Change the default SIP-ALG Mode
- Run the following commands from the CLI,
config system settings
 set default-voip-alg-mode kernel-helper-based
 end
- Enter the following command from the CLI,
execute reboot
The following commands describe how to configure an IP Pool when 3CX is not sharing the same public IP address as assigned to the wan facing interface, such as wan1 / wan2. Often this configuration is required when 3CX has a dedicated public IP address inside a block of addresses from your ISP. By comparison if 3CX is accessing the internet with nat on the same public IP address as the rest of the client network, then IP Pool is not required.
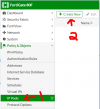
- Open the FortiGate GUI, enter the IP Pool menu and create a new IP Pool object as seen below,
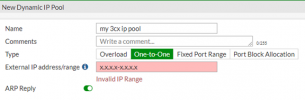
- Select one-to-one and enter the public IP address for 3CX.
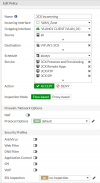
- Enter the policy menu from the FortiGate GUI and complete the following,
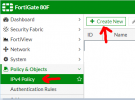
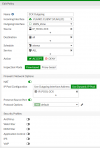
- Create an internal to wan policy as seen below. Notice if an IP Pool was required from step 4, then here we will select that object created previously. Also select Preserve Source Port as shown below.
Step 6: Create VIP Object ( port address translation rule object )
- From the FortiGate GUI, navigate to the VIP menu,
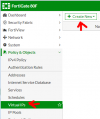
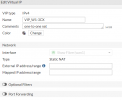
- Create the VIP object as shown below. Note the external IP is the public IP assigned to 3CX. Mapped is the internal IP address of the 3CX server.
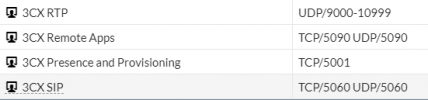
Step 7: Create Service Objects
From the FortiGate GUI, we will navigate to the services table.
- Policy & Objects --> Services --> Create New --> Service
- Proceed to create all the required objects necessary for 3CX as shown below. Refer to the manual for the most recent ports required.
Step 8: Create Outside to Inside Polices
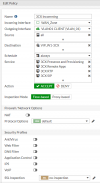
- Navigate to: Policy & Objects --> IPv4 Policy
- Create a new policy and enter the following. Notice the Destination field is where we select the VIP object created in step 6.
Service field is where we select the service objects created in step 7.
Step 9: Validating Your Setup
Log into your 3CX Management Console → Dashboard → Firewall and run the 3CX Firewall Checker. This will validate if your firewall has been configured correctly.