


- Joined
- Aug 3, 2018
- Messages
- 10
- Reaction score
- 5
We have an on premise 3CX system based in the UK which was upgraded in 2024 to V20 software. We have remote offices around the world and in particular, we wanted to allow our UK team to be able to make local outbound calls into India to both the landline and mobile indian networks. Prior to the V20 update, the addition of an FXO gateway was a simple task and could be selected by brand and model number with a configuration file generated by the 3CX system and then uploaded into the device. I set myself the challenge of configuring both analogue (landline) options and an additional backup of GSM gateway so that we had redundancy and could cope with two simultaneous calls from the UK to India.
In terms of hardware, I selected the following two models, both of which I had had working in version 18 3CX software:
1 - Analogue PSTN line - Grandstream GXW4108 (8 port) FXO gateway. This methodology works fine for the other port variants e.g. GXW4014 - 4 port.
2 - GSM gateway - Yeastar TG100. This is a single sim 3G gateway. Once again, other variants with multiple Sims are available and should work fine.
The Grandstream FXO gateway was plugged into one of the normal lan ports in the main fibre connected router (Airtel) in our India office. The first analogue port (from eight) was cabled directly into the analogue PSTN telephone line port, also presented on the back of the Airtel fibre router.
The Yeastar GSM gateway was provided with a single Indian Vodafone contract sim.
I struggled to find a suitable guide to set up both of these devices with 3CX version 20 and there are countless posts in this forum and others, requesting clear instructions how to get it working. I hope that this will prove useful to those looking to introduce such analogue and GSM gateways, especially as 3CX seems to have all but removed direct support for these devices. In the end, I was forced to draw upon isolated segments from many different manuals and guides available, both from 3CX and the hardware manufacturers (Grandstream & Yeastar).
In particular, I referenced:
https://www.3cx.com/docs/manual/configuring-voip-gateway/ - this was helpful in terms of some of the Grandstream settings
https://www.3cx.com/voip-gateways/grandstream-fxo/ - this was woefully out of date and, presumably based upon version 18 or earlier, talked about "SIP Trunk --> Add Gateway" followed by selecting the brand and model number, all of which is not on offer in version 20.
https://www.3cx.com/community/threads/fxo-gateway.124639/ - this was useful
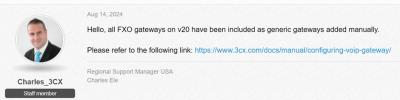
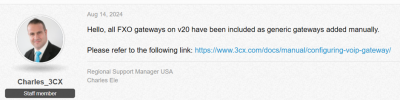
https://www.grandstream.com/hubfs/Product_Documentation/gxw410x_interop_3cx.pdf - this is the Grandstream version of setting up their device with 3CX but once again covers the earlier versions of 3CX which allowed for named PSTN gateways and specific models such as the Grandstream. Unfortunately, as confirmed by 3CX, all FXO gateways on version 20 are now to be added as generic gateways manually:
In terms of our UK <--> India office remote connectivity, I tried two different options, both of which worked fine.
Since both offices have entirely different LAN subnets, primarily I used a VPN tunnel (using two IPSEC Sonicwalls) to connect both sites:
The UK subnet was: 192.168.1.x
The India subnet was: 10.107.107.x
This guidance will obviously work if you have both the analogue FXO or GSM gateway in the same office or same subnet but if you are using a remote site, as I was, then you will need to establish a live VPN tunnel between both sites.
The second method I tested was to use an approved 3CX SBC (session border controller) phone in India - the admirable Yealink T43U. Installation of these is a breeze and is widely covered elsewhere. The SBC provides the necessary connectivity from the India remote office, directly into the 3CX system in the UK.
GENERAL STEPS TO FOLLOW
All of the above guides seem to make it much more complex than it really is and don't explain adequately what each stage is intended to achieve.
The key stages, for both analogue and GSM gateways are essentially the same:
1 - Factory reset the device and connect to the local network and analogue PSTN/GSM connectivity
2 - Identify the new device on the remote LAN and set a local static IP address/gateway/DNS
3 - Update the firmware of each device
4 - In 3CX, add a new 'gateway' or 'trunk' (it's critical which one you choose - see below notes) for each specific device. This will include the IP address of the remote gateway and create an account for the device within 3CX. It will also create an outbound rule which can be used to direct the traffic e.g. +91 xxxxx or 0091 xxxxx calls down the VPN towards the India-based devices.
5 - In the analogue or GSM gateway, add the SIP connection to allow connectivity to the 3CX platform using the IP address.
With the above five stages achieved, there should already be basic connectivity between 3CX and both remote gateway devices.
6 - Configure the VoIP traffic flow from 3CX to the remote gateway device - so that calls (carrying the India prefix) from the UK to India head to the remote device and the calls are correct reformatted to exit into the local analogue or mobile phone networks.
7 - Configure the VoIP traffic flow, coming inbound into the remote gateway device from inside India to the 3CX platform. In this case, I routed any incoming (India) calls coming to either the India analogue PSTN or GSM mobile number, to head to a particular extension in the UK.
One of the most critical findings I made was that the Grandstream Analogue GXW4108 FXO needs to be added as a Gateway in 3CX and yet the Yeastar GSM TG100 gateway needs to be added as a Trunk. It seems that they cannot be mixed. Perhaps the clue was in the name of the Grandstream FXO 'Gateway' and clearly the Yeastar GSM behaves more like a SIP trunk.


CONNECTION OF A REMOTE GRANDSTREAM GXW4104/8 ANALOGUE GATEWAY TO 3CX V20
Please ensure that these three first steps are completed:
1 - Factory reset the device and connect the gateway device to the local network and analogue PSTN/GSM connectivity
2 - Identify the new device on the remote LAN and set a local static IP address/gateway/DNS. Ensure all firewalls route SIP protocols correctly.
3 - Update the firmware of each device.
For this example:
3CX Server (in UK) has static IP 192.168.1.49 and is using default Port 5060 for SIP communications. Login as administrator or system admin level.
Grandstream Gateway has manually set static 10.107.107.61 as IP address with Gateway/DNS 10.107.107.1. All other settings are default including SIP communications port 5060. Login to the device with default password 'admin'.
4 - In 3CX - Admin - Settings - Voice & Chat
+ Add Gateway (***MUST BE ADDED AS A GATEWAY NOT TRUNK*****)

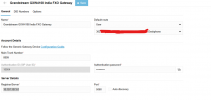
On the General Tab - (my examples in bold)
Name - Create a useful name for this gateway (can be anything - Grandstream GXW4108 India FXO Gateway
Default Route - This is where the incoming calls from India via this gateway route will be directed into 3CX - User - Extension 302
Main Trunk Number - this is manually added & required and needs to be any 4-digit number or greater - but not an existing extension or used No - 8899
Authentication ID - this is automatically added by 3CX for this gateway - but note as needed later by the remote device to connect to 3CX
Authentication password - this also automatically added by 3CX for the gateway - again used later by the remote device to connect to 3CX.
Registrar/Server - this is the IP address of the remote Grandstream FXO gateway - 10.107.107.61
Port - leave at default – 5060
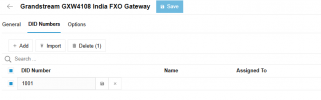
Then on the DID Numbers tab, depending on how many remote analogue lines that you have connected to the Grandstream (I have only one), add at least one DID number. I used the sequence 1001, 1002, 1000x as this was not in use by anything else. This is useful if you want to have multiple calls coming in from the remote site as each analogue line can have its port DID number.
Add - 1001 (or more if you wish)
Then Save these setings
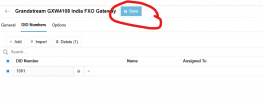
The 3CX is now ready to receive a SIP connection from the remote Grandstream.
5 - Initial connectivity settings in the Grandstream FXO
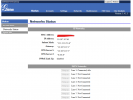
Initially the Status - Network Status should show the Phone Line Connected and Idle. If not then check the connection.
In terms of hardware, I selected the following two models, both of which I had had working in version 18 3CX software:
1 - Analogue PSTN line - Grandstream GXW4108 (8 port) FXO gateway. This methodology works fine for the other port variants e.g. GXW4014 - 4 port.
2 - GSM gateway - Yeastar TG100. This is a single sim 3G gateway. Once again, other variants with multiple Sims are available and should work fine.
The Grandstream FXO gateway was plugged into one of the normal lan ports in the main fibre connected router (Airtel) in our India office. The first analogue port (from eight) was cabled directly into the analogue PSTN telephone line port, also presented on the back of the Airtel fibre router.
The Yeastar GSM gateway was provided with a single Indian Vodafone contract sim.
I struggled to find a suitable guide to set up both of these devices with 3CX version 20 and there are countless posts in this forum and others, requesting clear instructions how to get it working. I hope that this will prove useful to those looking to introduce such analogue and GSM gateways, especially as 3CX seems to have all but removed direct support for these devices. In the end, I was forced to draw upon isolated segments from many different manuals and guides available, both from 3CX and the hardware manufacturers (Grandstream & Yeastar).
In particular, I referenced:
https://www.3cx.com/docs/manual/configuring-voip-gateway/ - this was helpful in terms of some of the Grandstream settings
https://www.3cx.com/voip-gateways/grandstream-fxo/ - this was woefully out of date and, presumably based upon version 18 or earlier, talked about "SIP Trunk --> Add Gateway" followed by selecting the brand and model number, all of which is not on offer in version 20.
https://www.3cx.com/community/threads/fxo-gateway.124639/ - this was useful
https://www.grandstream.com/hubfs/Product_Documentation/gxw410x_interop_3cx.pdf - this is the Grandstream version of setting up their device with 3CX but once again covers the earlier versions of 3CX which allowed for named PSTN gateways and specific models such as the Grandstream. Unfortunately, as confirmed by 3CX, all FXO gateways on version 20 are now to be added as generic gateways manually:
In terms of our UK <--> India office remote connectivity, I tried two different options, both of which worked fine.
Since both offices have entirely different LAN subnets, primarily I used a VPN tunnel (using two IPSEC Sonicwalls) to connect both sites:
The UK subnet was: 192.168.1.x
The India subnet was: 10.107.107.x
This guidance will obviously work if you have both the analogue FXO or GSM gateway in the same office or same subnet but if you are using a remote site, as I was, then you will need to establish a live VPN tunnel between both sites.
The second method I tested was to use an approved 3CX SBC (session border controller) phone in India - the admirable Yealink T43U. Installation of these is a breeze and is widely covered elsewhere. The SBC provides the necessary connectivity from the India remote office, directly into the 3CX system in the UK.
GENERAL STEPS TO FOLLOW
All of the above guides seem to make it much more complex than it really is and don't explain adequately what each stage is intended to achieve.
The key stages, for both analogue and GSM gateways are essentially the same:
1 - Factory reset the device and connect to the local network and analogue PSTN/GSM connectivity
2 - Identify the new device on the remote LAN and set a local static IP address/gateway/DNS
3 - Update the firmware of each device
4 - In 3CX, add a new 'gateway' or 'trunk' (it's critical which one you choose - see below notes) for each specific device. This will include the IP address of the remote gateway and create an account for the device within 3CX. It will also create an outbound rule which can be used to direct the traffic e.g. +91 xxxxx or 0091 xxxxx calls down the VPN towards the India-based devices.
5 - In the analogue or GSM gateway, add the SIP connection to allow connectivity to the 3CX platform using the IP address.
With the above five stages achieved, there should already be basic connectivity between 3CX and both remote gateway devices.
6 - Configure the VoIP traffic flow from 3CX to the remote gateway device - so that calls (carrying the India prefix) from the UK to India head to the remote device and the calls are correct reformatted to exit into the local analogue or mobile phone networks.
7 - Configure the VoIP traffic flow, coming inbound into the remote gateway device from inside India to the 3CX platform. In this case, I routed any incoming (India) calls coming to either the India analogue PSTN or GSM mobile number, to head to a particular extension in the UK.
One of the most critical findings I made was that the Grandstream Analogue GXW4108 FXO needs to be added as a Gateway in 3CX and yet the Yeastar GSM TG100 gateway needs to be added as a Trunk. It seems that they cannot be mixed. Perhaps the clue was in the name of the Grandstream FXO 'Gateway' and clearly the Yeastar GSM behaves more like a SIP trunk.
CONNECTION OF A REMOTE GRANDSTREAM GXW4104/8 ANALOGUE GATEWAY TO 3CX V20
Please ensure that these three first steps are completed:
1 - Factory reset the device and connect the gateway device to the local network and analogue PSTN/GSM connectivity
2 - Identify the new device on the remote LAN and set a local static IP address/gateway/DNS. Ensure all firewalls route SIP protocols correctly.
3 - Update the firmware of each device.
For this example:
3CX Server (in UK) has static IP 192.168.1.49 and is using default Port 5060 for SIP communications. Login as administrator or system admin level.
Grandstream Gateway has manually set static 10.107.107.61 as IP address with Gateway/DNS 10.107.107.1. All other settings are default including SIP communications port 5060. Login to the device with default password 'admin'.
4 - In 3CX - Admin - Settings - Voice & Chat
+ Add Gateway (***MUST BE ADDED AS A GATEWAY NOT TRUNK*****)
On the General Tab - (my examples in bold)
Name - Create a useful name for this gateway (can be anything - Grandstream GXW4108 India FXO Gateway
Default Route - This is where the incoming calls from India via this gateway route will be directed into 3CX - User - Extension 302
Main Trunk Number - this is manually added & required and needs to be any 4-digit number or greater - but not an existing extension or used No - 8899
Authentication ID - this is automatically added by 3CX for this gateway - but note as needed later by the remote device to connect to 3CX
Authentication password - this also automatically added by 3CX for the gateway - again used later by the remote device to connect to 3CX.
Registrar/Server - this is the IP address of the remote Grandstream FXO gateway - 10.107.107.61
Port - leave at default – 5060
Then on the DID Numbers tab, depending on how many remote analogue lines that you have connected to the Grandstream (I have only one), add at least one DID number. I used the sequence 1001, 1002, 1000x as this was not in use by anything else. This is useful if you want to have multiple calls coming in from the remote site as each analogue line can have its port DID number.
Add - 1001 (or more if you wish)
Then Save these setings
The 3CX is now ready to receive a SIP connection from the remote Grandstream.
5 - Initial connectivity settings in the Grandstream FXO
Initially the Status - Network Status should show the Phone Line Connected and Idle. If not then check the connection.
Attachments

Last edited:


