In reality, it's not that complicated; you would just need to make a couple of tweaks for the S3-Bucket to function as a system drive.
Here is a quick guide on how to do it:
In Amazon S3, data is stored in “buckets”, the basic unit of data storage. You can configure permissions for users to access the buckets via the AWS web interface. If you want access to AWS S3 to be available without a web browser, you can allow users to use the interface of an operating system such as Linux, Windows, or macOS.
Access to Amazon S3 cloud storage from the command line can be handy in several scenarios. This is particularly useful with operating systems that don’t have a graphical user interface (GUI), in particular VMs running in a public cloud, and for automating tasks such as copying files or creating
cloud data backups.
Read on to learn how to mount Amazon S3 bucket as a filesystem on a Linux machine and as a drive to a local directory on Windows and macOS machines to be able to use AWS S3 without a web browser.
How to Mount an S3 Bucket as a filesystem in Linux
AWS provides an API to work with Amazon S3 buckets using third-party applications. You can even write your own application that can interact with S3 buckets by using the Amazon API. You can create an application that uses the same path for uploading files to Amazon S3 cloud storage and provide the same path on each computer by mounting the S3 bucket to the same directory with S3FS. In this tutorial, we use S3FS to mount an Amazon S3 bucket as a disk drive to a Linux directory.
S3FS is a special solution based on FUSE (file system in user space), developed to mount S3 buckets to directories of Linux operating systems, similarly to the way you mount
CIFS or NFS share as a network drive. S3FS is a free and open-source solution.
After mounting Amazon S3 cloud storage with S3FS to your Linux machine, you can use
cp,
mv,
rm, and other commands in the Linux console to operate with files as you do when working with mounted local or network drives.
Let’s mount an Amazon S3 bucket to a Linux directory with Ubuntu 18.04 LTS as an example. A fresh installation of Ubuntu is used in this walkthrough. You can use the same principle for newer versions.
- Update the repository tree:
- If any existing FUSE is installed on your Linux system, remove that FUSE before configuring the environment and installing fuse-f3fs to avoid conflicts. As we’re using a fresh installation of Ubuntu, we don’t run the sudo apt-get remove fuse command to remove FUSE.
- Install s3fsfrom online software repositories:
Code:
sudo apt-get install s3fs
- You need to generate the access key ID and secret access key in the AWS web interface for your account (IAM user). The IAM user must have S3 full access. You can use this link:
https://console.aws.amazon.com/iam/home?#/security_credentials
NOTE: It is recommended that you mount Amazon S3 buckets as a regular user with restricted permissions and use users with administrative permissions only for generating keys.
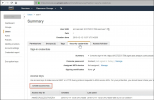
- These keys are needed for AWS API access. You must have administrative permissions to generate the AWS access key ID and AWS secret access key. If you don’t have enough permissions, ask your system administrator to generate the AWS keys for you. The administrator can generate the AWS keys for a user account in the Users section of the AWS console in the Security credentials tab by clicking the Create access key button.
6. In the
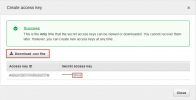
Create access key popup window, click
Download .csv file or click
Show under the
Secret access key row name. This is the only case when you can see the secret access key in the AWS web interface. Store the AWS access key ID and secret access key in a safe place.
7. Go back to the Ubuntu/Debian (potaito potato) console to create a configuration file for storing the AWS access key and secret access key needed to mount an S3 bucket with S3FS. The command to do this is:
Code:
echo ACCESS_KEY:SECRET_ACCESS_KEY > PATH_TO_FILE
Change
ACCESS_KEY to your AWS access key and
SECRET_ACCESS_KEY to your secret access key.
In this example, we will store the configuration file with the AWS keys in the home directory of our user. Make sure that you store the file with the keys in a safe place that is not accessible to unauthorized persons.
Code:
echo AKIA4SK3HPQ9FLWO8AMB:esrhLH4m1Da+3fJoU5xet1/ivsZ+Pay73BcSnzP > ~/.passwd-s3fs
- Check whether the keys were written to the file:
- Set correct permissions for the passwd-s3fsfile where the access keys are stored:
- Create the directory (mount point) that will be used as a mount point for your S3 bucket. In this example, we create the Amazon cloud drive S3 directory in the home user’s directory.
You can also use an existing empty directory.
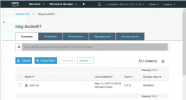
- The name of the bucket used in this walkthrough is blog-bucket01. The text1.txt file is uploaded to our blog-bucket01 in Amazon S3 before mounting the bucket to a Linux directory. It is not recommended to use a dot (.) in bucket names.
- Let’s mount the bucket. Use the following command to set the bucket name, the path to the directory used as the mount point, and the file that contains the AWS access key and secret access key.
Code:
s3fs bucket-name /path/to/mountpoint -o passwd_file=/path/passwd-s3fs
In our case, the command we use to mount our bucket is:
Code:
s3fs blog-bucket01 ~/s3-bucket -o passwd_file=~/.passwd-s3fs
- The bucket is mounted. We can run the commands to check whether our bucket (blog-bucket-01) has been mounted to the s3-bucketdirectory:
Code:
mount | grep bucket
df -h | grep bucket
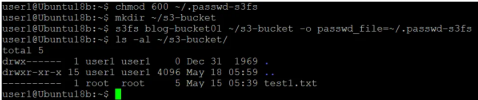
- Let’s check the contents of the directory to which the bucket has been mounted:
As you can see in the screenshot below, the test1.txt file uploaded via the web interface before is present and displayed in the console output.
- Now you can try to create a new file on your hard disk drive and copy that file to the S3 bucket in your Linux console.
Code:
echo test2 > test2.txt
cp test2.txt ~/s3-bucket/
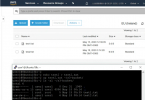
- Update the AWS web page where your files in the bucket are displayed. You should see the new test2.txt file copied to the S3 bucket in the Linux console by using the directory to which the bucket is mounted.
How to mount an S3 bucket on Linux boot automatically
If you want to configure the automatic mount of an S3 bucket with S3FS on your Linux machine, you have to create the
passwd-s3fs file in
/etc/passwd-s3fs, which is the standard location. After creating this file, you don’t need to use the
-o passwd_file key to set the location of the file with your AWS keys manually.
- Create the /etc/passwd-s3fsfile:
NOTE: If vim the text editor has not been installed yet in your Linux, run the apt-get install vim command.
- Enter your AWS access key and secret access key as explained above.
Code:
AKIA4SK3HPQ9FLWO8AMB:esrhLH4m1Da+3fJoU5xet1/ivsZ+Pay73BcSnzcP
As an alternative, you can store the keys in the /etc/passwd-s3fs file with the command:
Code:
echo AKIA4SK3HPQ9FLWO8AMB:esrhLH4m1Da+3fJoU5xet1/ivsZ+Pay73BcSnzcP > /etc/passwd-s3fs
- Set the required permissions for the /etc/passwd-s3fsfile:
Code:
chmod 640 /etc/passwd-s3fs
- Edit the FUSE configuration file:
- Uncomment the user_allow_other string if you want to allow using Amazon S3 for file sharing by other users (non-root users) on your Linux machine.
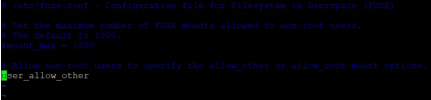
- Open /etc/fstabwith a text editor:
- Add the line in the end of the file:
Code:
s3fs#blog-bucket01 /home/user1/s3-bucket/ fuse _netdev,allow_other,url=https://s3.amazonaws.com 0 0
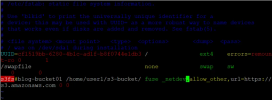
- Save the edited /etc/fstabfile and quit the text editor.
Note: If you want to set the owner and group, you can use the -o uid=1001 -o gid=1001 -o mp_umask=002 parameters (change the digital values of the user id, group id and umask according to your configuration). If you want to enable cache, use the -ouse_cache=/tmp parameter (set a custom directory instead of /tmp/ if needed). You can set the number of times to retry mounting a bucket if the bucket was not mounted initially by using the retries parameter. For example, retries=5 sets five tries.
- Reboot the Ubuntu machine to check whether the S3 bucket is mounted automatically on system boot:
- Wait until your Linux machine is booted.
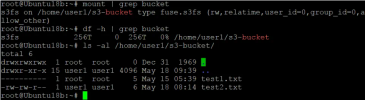
- You can run commands to check whether the AWS S3 bucket was mounted automatically to the s3-bucketdirectory son Ubuntu boot.
Code:
mount | grep bucket
df -h | grep bucket
ls -al /home/user1/s3-bucket/
In our case, the Amazon cloud drive S3 has been mounted automatically to the specified Linux directory on Ubuntu boot (see the screenshot below). The configuration was applied successfully.
S3FS also supports working with
rsync and file caching to reduce traffic.
Cheers!


