Solved Wordpress Live Chat using 3CX with two different queues

Status
Not open for further replies.

DavidISO

Free User
Joined
Sep 21, 2018
Messages
6
Reaction score
1
We have had the 3CX Live Chat plugin working on our Wordpress site for some time. We would now like to add another department/queue to the system so users could be offered a choice of queues e.g. "Sales" chat on some pages and "Support" on others. I can see that something like this is possible with the "Standalone - no 3CX" configuration but haven't found a way of doing it with a 3CX connection which we would like for better integration of queues etc.

Does anyone know if this is possible please? Or will we have to use a different instance of Wordpress or try to configure it on our Drupal 7 basedsupport website instead, although there isn't a 3CX modules for this (Drupal 7 will be supported until late 2023 at present?

We are only interested in text-based chat, not voice or video. We are using the latest Wordpress and 3CX Live Chat 9.4.1 with 3CX 18 update 3. It says Free User against my name, but we have an 8-user system.

Many thanks
 
Hi @DavidISO,

What you can do is to either use multiple queues, or if you wish to remain on standard, create extensions and enable their Click2Talk. Now you can use the HTML code generator and place them on different pages on your site, like a Support Page and the other to a Sales page: https://www.3cx.com/live-chat/code-generator/
 
That was quick, thank you!

We aren't using standard as I understand it, so I don't quite follow how to make use of multiple queues as you suggest in the first part of your reply. There appears to be just one queue under advanced settings for the plug in: we have the chat server set to 3CX with a url of https://xxxx.3cx.co.uk/callus/#saleslivechat.

I am not also quite clear about what you mean by 'standard'.

But maybe the essence of what you are saying is that either way we need to use your code generator for one or more of the queues and put that code on pages that haven't the plug-in enabled on them?
 
Hi @DavidISO,

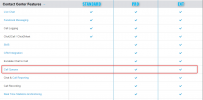
Thanks for your reply! Let's break some things down: We have 3 editions of the PBX, Standard, Professional and Enterprise, they're outlined in more detail here: https://www.3cx.com/ordering/pricing/ Something to note:

1649749921771.png

So what I meant was, if you want to stay on a free license, then you'd not be using Call Queues.

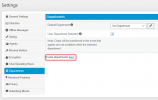
If you'd like to continue using the Standalone version of Live Chat, then you need only add departments to your live chat back end and check the box that says User Department Selection:

1649752380126.png

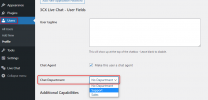
Then add your users to the relevant department:

1649752431863.png

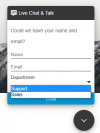
This will lead to the users who are starting chats being offered which department they'd like to connect to:

1649752341202.png

Note that if you want the chat to be specific, as mentioned above previously. You'll need to use the 3CX Version of Live Chat and use the HTML code generator. Let me know if the above suggestion will work for you, else we can go over how to set up your 3CX Live Chat and install your PBX.
 
Hello again,

Thank you for your detailed reply. We do have queues as we have Professional which we host ourselves. I mentioned this in my first post as I can't find out where to change my user profile to show this.

We would like to use two different queues please i.e. exclude the existing one from some of the Wordpress pages and then add a new one to those pages. As far as I could see the HTML code generator only works with a single queue, but perhaps that has to be done twice using differerent filenames for the js files?
 
Hi @DavidISO,

Thanks for updating me, that's perfect. Then you're almost there.

As far as I could see the HTML code generator only works with a single queue, but perhaps that has to be done twice using differerent filenames for the js files?
Yes! Run it each time you'd like to create a new Chat. Paste it on the applicable pages. In each queue, navigate to the Click2Talk/Click2Meet tab and enable Click2Talk, copy that URL and use it in the HTML code generator that is relevant to it.
 
Got you.

What I hadn't realised until just now when I viewed the source of a page using your Plugin was how the Plugin works i.e. it replicates what the wizard does by adding a <call-us></call-us> section to each chosen page with a load of parameters completed for it.

This was partly because if you check the box on the Wizard saying that you are self-hosting you are offered the js, but the Finish button doesn't seem to get enabled and the HTML to be inserted nevern appears; all you are offered appears to be the js files without the <call-us></call-us> section.

I have it working now as a proof of concept whilst we consider the wording and appearance that we require for it.

Thank you again.
 
  • Like
Reactions: VasilisV_3CX
PS, is there a way of changing DavidISO to not display as a Free User please?
 
Sure thing @DavidISO,

The reason you're displaying as a Free User, is because the account you've logged in to is associated to a v15.5 key that is non-commercial. If you have the admin of the key you'd like to be associated to, invite you from their customer portal, you can log out of the forum and wait 24hrs, the change should be complete and log back in.
 
Status
Not open for further replies.

Forum statistics

Threads
112,147
Messages
590,961
Members
165,167
Latest member
Finatra.us