Minimum ID Length Error

Status
Not open for further replies.

ct8916

Customer
Joined
Apr 24, 2020
Messages
27
Reaction score
3
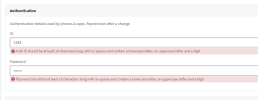
So 3CX is forcing me to create longer ID's and passwords. See attached.

This now means I can't set up a Yealink T42G, I believe this is because of the mismatch between the ID and extension. Does anyone know how to resolve this?
 

Attachments

  • Screenshot 2023-02-16 145121.png
    Screenshot 2023-02-16 145121.png
    16.1 KB · Views: 3
Hi,

This is not due to a mismatch at all. Let's take it from the start and you should be able to setup your T42G in no time!

Here is what you can do:

1. First upgrade the phone from here - there is new firmware available and it's very important that you install it first:
https://www.3cx.com/support/phone-firmwares/

2. Make sure you are running V18 update 6 which bring back full support for the T42G auto-provisioning

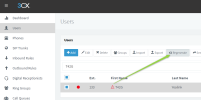
3. Find your "Users" that have low complexity credentials (they have an exclamation mark) and regenerate their credentials from your management console using the button above like my screenshot:

1676559665726.png

You now have secure credentials and are ready to provision your phone :)

4. Factory reset the phone so it can forget all the previous settings, and then assign it to your extension from the "Phones" page using the Assign Ext. button (works for Local phones or SBC phones - if using STUN you need to copy the provisioning URL into your phone and reboot it).

The phone will auto-provision and restart. It's now ready to use!
 
Hi,

This is not due to a mismatch at all. Let's take it from the start and you should be able to setup your T42G in no time!

Here is what you can do:

1. First upgrade the phone from here - there is new firmware available and it's very important that you install it first:
https://www.3cx.com/support/phone-firmwares/

2. Make sure you are running V18 update 6 which bring back full support for the T42G auto-provisioning

3. Find your "Users" that have low complexity credentials (they have an exclamation mark) and regenerate their credentials from your management console using the button above like my screenshot:

View attachment 34313

You now have secure credentials and are ready to provision your phone :)

4. Factory reset the phone so it can forget all the previous settings, and then assign it to your extension from the "Phones" page using the Assign Ext. button (works for Local phones or SBC phones - if using STUN you need to copy the provisioning URL into your phone and reboot it).

The phone will auto-provision and restart. It's now ready to use!
Thanks for your this.

I have followed all the steps but on step 4 I can't find the phone in the list?!
 
Is your phone on the same LAN as the PBX machine? (ie. same IP range and able to see each other)

And if yes, do you allow multicast messages on your LAN?
 
Is your phone on the same LAN as the PBX machine? (ie. same IP range and able to see each other)

And if yes, do you allow multicast messages on your LAN?
Hello

Yes.

How do I check multicast?

Is there any way to add it via the phone?
 
Yes you can:

1. Edit the extension

2. Go to the Provisioning Tab

3. Make sure a phone does not already exist, and add a new phone

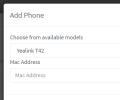
4. At the very very bottom of the list you will see the plain T42 model - select it and enter your MAC and press OK
1676561213988.png

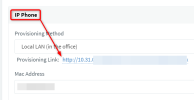
5. Copy the provisioning URL from below:
1676561385970.png

6. Press the big OK on the very top to save the changes.

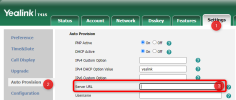
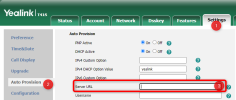
7. Now log into the web UI of your freshly reset and upgraded Yealink, and you can add the provisioning URL we copied earlier:

Settings >> Auto Provision >> Server URL
1676566783772.png
Press "Confirm" on the bottom of the page, and then click "Auto Provision Now" again at the bottom of the page (or reboot the phone)
 
Last edited:
If you manage to get multicast working it would be much easier to provision them. They will appear in the Phones page as New and you can simply select them and assign them to their extension. Otherwise, the above method also works fine for manual provisioning
 
Yes you can:

1. Edit the extension

2. Go to the Provisioning Tab

3. Make sure a phone does not already exist, and add a new phone

4. At the very very bottom of the list you will see the plain T42 model - select it and enter your MAC and press OK
View attachment 34315

5. Copy the provisioning URL from below:
View attachment 34316

6. Press the big OK on the very top to save the changes.

7. Now log into the web UI of your freshly reset and upgraded Yealink, and you can add the provisioning URL we copied earlier:

Settings >> Auto Provision >> Server URL

OK to save and then click Autoprovision at the bottom (or reboot the phone)
The provisioning link doesn't work. "page cannot be found". The phone is connected to the network.
 
Take another look at my instructions above, the link is not meant for browsers (the won't see anything).
It's meant to go here and the phone will know exactly what to do next:
1676566701555.png
 
Take another look at my instructions above, the link is not meant for browsers (the won't see anything).
It's meant to go here and the phone will know exactly what to do next:
View attachment 34318
Thanks - I didn't scroll down enough!! It's been a long week.
 
No worries, hope all went well in the end!
 
Status
Not open for further replies.

Members Online Now

Forum statistics

Threads
111,832
Messages
589,285
Members
164,662
Latest member
DejanMDS