


3CX Video Conference in V18 breaks ties with its predecessors and relocates a lot of its data warehousing into your 3CX System. This sets a new standard for privacy, safeguarding your own data and that of your attendees. In order to properly cater for this shift, here are a few tips for admins to take note.
Use default HTTPS port 443
Participants and scheduled meetings are stored solely on your 3CX Server. This means participants joining a meeting will first need to connect to your system to gain authenticated access. To achieve the broadest compatibility for others joining one of your meetings, use the default HTTPS port (443).
This benefits guests that are joining your meeting and are connecting from restricted networks (enterprise networks, hotels, and airports), because despite the restricted access in these places, the standard HTTPS port is still usually permitted.
In case you cannot use the default HTTPS port in your on-premise network for any reason, consider moving your 3CX System into the cloud. This will also be beneficial for the next point.
On-premise instances require “Split-Brain DNS”

If your installation is in the cloud, there is nothing you need to worry about, and can move onto the next point.
If you have an on-premise 3CX though and your users are accessing it from within your network (LAN, internal IP) and from the web (WAN, external IP), you need to have Split-Brain DNS.
You have to manage your internal DNS service in such a way that your 3CX’s FQDN resolves the Internal IP for users on the same LAN and the Public IP for users outside the LAN (which is managed by 3CX for 3CX domains).
“Split-Brain DNS” is essential for WebRTC to function properly. It requires a trusted HTTPS connection to your 3CX system, which cannot be accomplished by using IP addresses in your URLs.
Besides this, other services within 3CX will also benefit from this setup. Our mobile apps will (re-)connect faster and more seamlessly, access to the WebClient uses always the same URL and reports references are always valid regardless if shared with internal or external users.
Note: “Split-Brain DNS” setups will become mandatory in 3CX Systems in the future.
You can read how to configure Split-Brain DNS here.
Custom SSL certificate requirements
If you are using a 3CX provided FQDN, we will set up and configure your SSL Certificate from the start and manage it from there onwards.
In case you run 3CX on a custom non-3CX FQDN, you are in charge of ordering, purchasing, inserting, and updating the SSL Certificate in your 3CX web configuration.
Besides the certificate, don’t forget you also need to include any intermediate certificates required in the same file so that the certificate chain is complete, all the way down to the root CA.
Don't be fooled that Chrome and Edge may connect to your 3CX System with no warnings. Check with tools such as https://www.sslshopper.com/ssl-checker.html how your system is really configured. Apps on iOS and Android might not connect if the certificate chain is incomplete.
If all the above doesn’t make much sense to you, don't worry, just use a 3CX FQDN and forget about it.
Still using the legacy Windows Client?
Along with V18, we released the new 3CX Desktop App. If all your users are already using it, this part does not apply to you.
For those using the older 3CX Windows Client, although it was marked as “Legacy” and will not be receiving any more updates, it still works with V18 Update 3 and can start quick meetings.
Changes required for each user
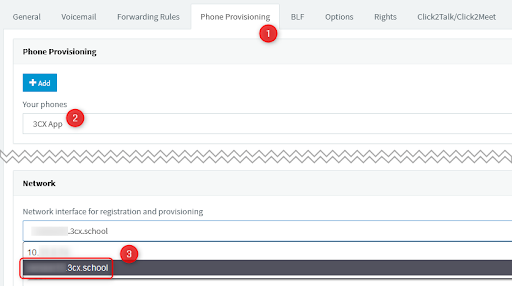
For on-premise installations with the legacy app, ensure this setup:
- Configure Split-Brain DNS as mentioned above.
- In the 3CX Management Console navigate to “Users” then selected all extensions that use this client
- Navigate to the “Phone Provisioning” tab, select the “3CX App” and then under “Network”, click the drop down list and select the FQDN from the drop-down,
- Finally, press “OK”.
- Ask the users to exit the app and relaunch it for the settings to take effect.
Zero-trust networks
Some 3CX System installations are placed in zero-trust networks. In order for 3CX Video Conference to operate correctly, the 3CX System and its users need connectivity to the 3CX Video Conferencing platform in the Cloud and users need to be able to connect to your system in order to start a video session.
Inbound
Participants and Users will first connect to the FQDN and HTTPS Port of your 3CX System, then they will be assigned and redirected to a processing unit in the 3CX Cloud.
This means that participants and users need to be able to reach your 3CX System on its HTTPS Port.
Outbound
Participants, users, and your 3CX Server need to be able to connect to the servers that the 3CX Video Conference Cloud platform consists of.
These Servers are:
- v18-vc-qos.3cx.net (443:TCP and 48000-65535:UDP)
- wmr.3cx.net (443:TCP)
- wmr-cdn.3cx.net (443:TCP)
- files-eu.3cx.net (443:TCP)
- files-us.3cx.net (443:TCP)
- files-as.3cx.net (443:TCP)
- files-uk.3cx.net (443:TCP)
- files-au.3cx.net (443:TCP)
- files-sa.3cx.net (443:TCP)
- files-af.3cx.net (443:TCP)
Note that the IPs these FQDNs resolve to are subject to change. Make sure you configure the FQDNs in your network equipment, not just the IPs, and that the TTL is respected so that the IPs are refreshed and updated on time.




 Copyright © 2026