Hello
@nisutech,
Please note that this will require to deploy a new instance so you can change the FQDN to a custom one.
In addtion, You must purchase, upload, and manually renew your own SSL certificate for the custom domain going forward.
Please see our blog post
How to Use Your Own SSL & FQDN Certificate
Also,
You will have to reset to factory and reprovision any IP phone device you might have, as the provisioning URL will change
SBCs will lose connection so you will have to reinstall them
If you are using Mobile Apps then you will have to reprovision them via the QR code.
Also you will have to login again in your Web Clients using the new FQDN.
If you are using any integrations like CRM or M365 then you will also have to reconfigure them.
To proceed, you will first need to create a backup of your system without including the FQDN and License Key information. This will allow you to restore it to the new deployment once it has been created. For more information, please refer to our '3CX Backup & Restore Commands' document:
https://www.3cx.com/docs/backup-restore-command-line/
Once the backup has been created, you will need to release the current FQDN from the license before creating the new installation. To do so:
1. Log in to the 3CX Customer Portal using the assigned email (Registration email for this key ) and navigate to 'My Systems'. Select the desired instance and click on 'Manage'.
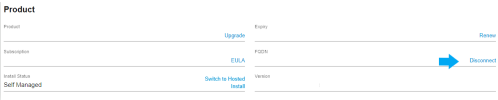
2. Under your product's information, find the Install Status and FQDN. As this is a self-hosted deployment, first turn off the host machine for this PBX. Once the PBX is stopped, refresh the license key information page, and you will find the 'Disconnect' option at the end of the FQDN entry.
View attachment 52212
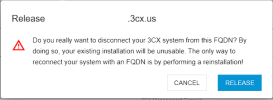
3. Click on 'Disconnect', and you will receive the 'FQDN release warning'. Click on 'Release' to disconnect your system from the current FQDN.
View attachment 52213
Once this is completed, you can deploy a new system without restoring the backup, using the same license key and select a Custom FQDN during the deployment process.
After the new deployment has been completed, configure the backup storage location under Admin > System > Storage so the system can access the previously created backup. Then navigate to Admin > Backup, select the backup, and click Restore to recover your previous configuration. This is required since you cannot restore a backup without FQDN and License Key information.