- Joined
- Dec 15, 2017
- Messages
- 19
- Reaction score
- 0
Hi all,
I am doing final steps on a test 3cx environment for my office and before I have people start using it, I want to make sure they get their welcome email and can be setup and ready to go.
The issue I am having is the config file that is generated for the welcome email is configuring their phone/account profile with the local IP of the server for the "In Office" location and it's preventing the phone from connecting. I need it to use the FQDN that it is using for "Out of Office". I have the system built in AWS and even though I gave it a static public IP and FQDN, it is sending the config file out with the local server IP.
I found some parameters in the management console, but I want to make sure I change the correct ones.
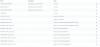
Attached is a list of the parameters with the local IP and below are the values in the generated 3CXprov config file that I need to change from local IP to FQDN. How can I make it so the config files get generated with the FQDN without breaking anything?
<PBXLocalAddr>10.5.2.64</PBXLocalAddr>
<ProvLink>https://10.5.2.64:5001/provisioning/cmw16gqvqm042l/TcxProvFiles/3cxProv_BSY9JN1P6R7108.xml</ProvLink>
<MyPhoneServerLocalSSLAddr>https://10.5.2.64:5001/myphone/MPWebService.asmx</MyPhoneServerLocalSSLAddr>
I am doing final steps on a test 3cx environment for my office and before I have people start using it, I want to make sure they get their welcome email and can be setup and ready to go.
The issue I am having is the config file that is generated for the welcome email is configuring their phone/account profile with the local IP of the server for the "In Office" location and it's preventing the phone from connecting. I need it to use the FQDN that it is using for "Out of Office". I have the system built in AWS and even though I gave it a static public IP and FQDN, it is sending the config file out with the local server IP.
I found some parameters in the management console, but I want to make sure I change the correct ones.
Attached is a list of the parameters with the local IP and below are the values in the generated 3CXprov config file that I need to change from local IP to FQDN. How can I make it so the config files get generated with the FQDN without breaking anything?
<PBXLocalAddr>10.5.2.64</PBXLocalAddr>
<ProvLink>https://10.5.2.64:5001/provisioning/cmw16gqvqm042l/TcxProvFiles/3cxProv_BSY9JN1P6R7108.xml</ProvLink>
<MyPhoneServerLocalSSLAddr>https://10.5.2.64:5001/myphone/MPWebService.asmx</MyPhoneServerLocalSSLAddr>