


If you prefer to keep your 3CX backups and recordings secure within the confines of your LAN, a NAS (Network Attached Storage) device is the answer. It’s a simple and affordable solution, especially when compared to setting up a fully-fledged server. Synology is a popular choice to easily add shared storage on your network for backing up your PBX, archiving recordings and more. Even though devices like a Synology NAS include more features than you can shake a stick at, this article focuses on configuring the SFTP, SMB and FTP services to use in combination with your 3CX PBX. Keep in mind that to take advantage of all of the described file services, you need to be on V16 Update 4.
Enable File Services
To configure your NAS you need to use DiskStation Manager (DSM), the web-based graphical UI for managing Synology devices. With DSM you can easily set up FTP (File Transfer Protocol), SFTP (Secure FTP) and Samba (SMB, Server Message Block) services on your Synology NAS. Enable only the file sharing service(s) needed to back up 3CX and/or to archive your recordings. To do this, open up a browser window and:
- Login to the DSM administration URL, usually “http://<your_NAS_IP>:5000”.
- Open “Control Panel” and then “File Services”.
- Now enable the file sharing services to use:
- SMB / Windows File Sharing: Set the “Enable SMB service” option under the “SMB/AFP/NFS” tab. Keep in mind that the SMB share path needs to be in this format: “smb://<NAS_hostname_or_IP>/my/shared/folder”.
- FTP: Set the “Enable FTP service (No encryption)” option under the “FTP” tab. You can also enable the “FTP/SSL/TLS encryption service (FTPS)” to use encryption for securing FTP transfers. Recommend setting a higher port than the default “21” e.g. “9021”.
- SFTP: Scroll down while on the “FTP” tab and set the “Enable SFTP service”. Recommend setting the relevant port number to a higher port than the default “22”, e.g. “9022”.
- Rsync: On the “rsync” tab, you can optionally set the “enable rsync service” to use the NAS device as an rsync destination. Check out this article for more info on using rsync to create redundant copies of your 3CX backups and recordings.
- Click “Apply” to save your settings and start the enabled file services.
Create a Shared Folder
Shared folders are used as file repositories on the network, for exchanging files between users and devices. Synology takes this concept a step forward by re-using a shared folder structure for all file services, be it Samba, FTP or SFTP. This simplifies backing up and archiving from 3CX, as you only need to create a single file share:
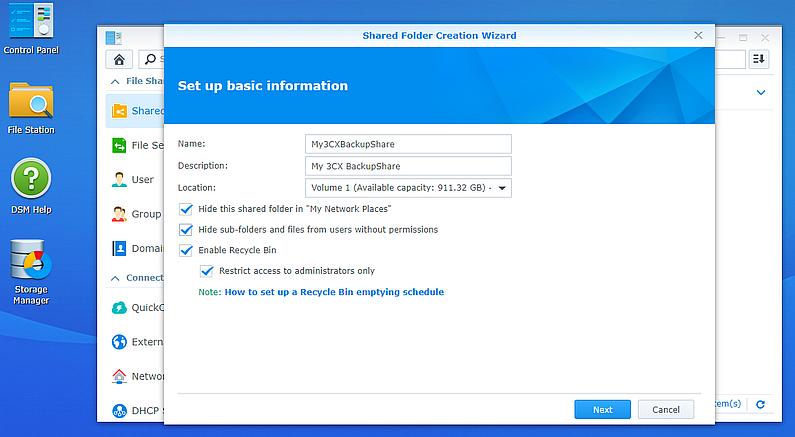
- Login to DSM and go to “Control Panel” > “Shared Folder”.
- Click on “Create” and enter a name without spaces for the new shared folder, e.g. “My3CXBackupShare”. You can also use the “Description” field to describe this file share.
- Select the available storage “Location” to use for creating the file share, e.g. “Volume 1”.
- These settings are recommended:
- “Hide this shared folder in ‘Network Places’” - use this for the share to be inaccessible to users browsing shared folders on the network.
- “Hide sub-folders and files from users without permissions” - use this for a more granular control of who can see the files stored in this share.
- “Enable Recycle Bin” - useful for easy restore of accidentally deleted shared files. The “Restrict access to administrators only” enables the use of the recycle bin to administrators only.
- Click “Next” and optionally set encryption options for the shared folder contents. Click “Next” to proceed.
- Click “Apply” to create the share.
Create a NAS User
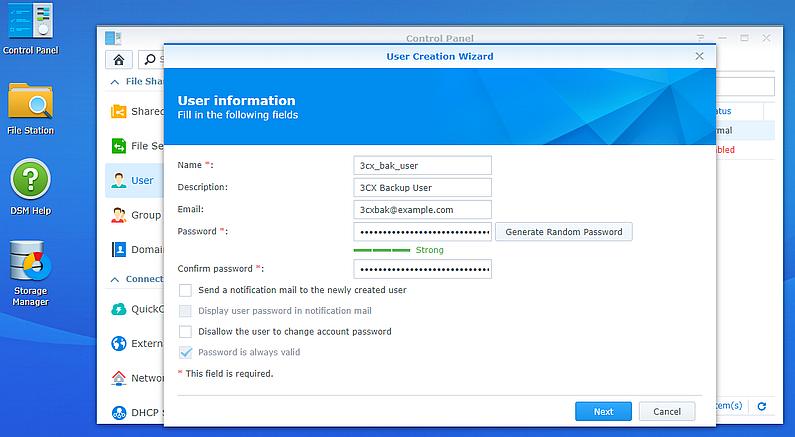
This step is not strictly required, however it is recommended to create a dedicated user account to use for 3CX-related operations instead of re-using an existing one. You can even opt for creating one user for backups and another for archiving recordings. To create a user on your synology NAS:
- Login to DSM, go to “Control Panel” > “User” and click on “Create”.
- Enter the user account credentials and details. Choose a strong and complex password or use the provided “Generate Random Password” function for convenience. Click “Next”.
- Select the group to add your new user to, i.e by default the “users” group, and click “Next”.
- Enable the “Read/Write” permissions for the shared folder you created earlier so that the user can transfer files to and from the folder.
- You can optionally set a quota limit and click “Next” to proceed.
- Assign the relevant application permissions for the applications that the user will use, e.g. FTP and rsync. Click “Next”.
- On the “User Speed Limit Setting” dialog, click “Next” to continue.
- Verify the configured settings for the user and click “Apply” to confirm.
Lights, Camera... Action!
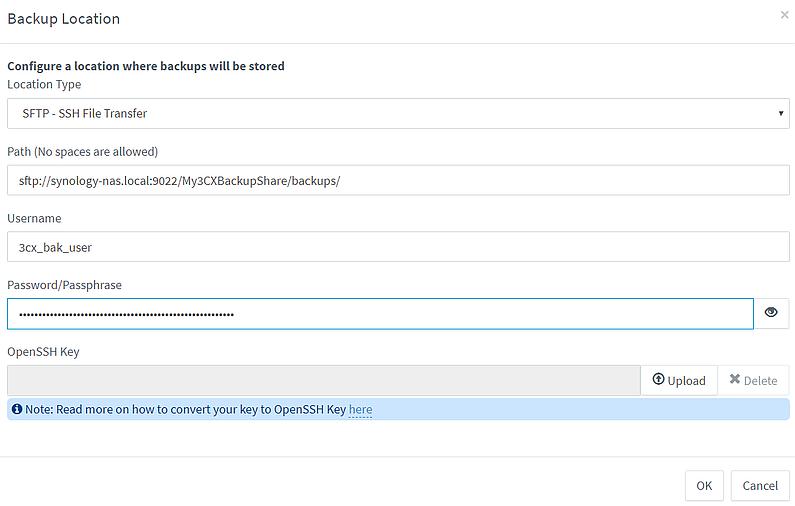
With the Synology NAS file services configured and a shared folder to use for backing up your 3CX PBX and archive recordings, we are ready for some backup and archiving action! Review the new backup options in V16 Update 4 and use the example locations below to backup and/or archive recordings with the credentials for the NAS user you have created:
- SFTP: Note that you have to explicitly specify the port number if you set a custom port for the SFTP service:
- sftp://synology-nas.local:9022/My3CXBackupShare/backups/
- FTP:
- ftp://synology-nas.local/My3CXBackupShare/backups/
- Samba: If your NAS device is not part of a domain, you can use the name of the workgroup you specified in the SMB configuration, or leave it empty.
- smb://synology-nas.local/My3CXBackupShare/backups/
Setup SSH for Remote Administration Command Shell
Use SSH (Secure SHell) to login and remotely manage a Synology NAS device, instead of using just DSM. This is not for everyone but can be useful for monitoring file transfer progress, logs and so on. To do this, open up a browser window and:
- Login to DSM and open “Control Panel” > “Terminal & SNMP”.
- Set “Enable SSH Service” and set a port other than “22”, preferably a higher port like “9922” to "hide" the SSH service from casual network scans.
- Click “Apply” to confirm your settings and enable the SSH service.
- Verify by logging in from another machine on your network with an administrative user account, for example:
- ssh -p 9922 [email protected]
If you have specified the correct settings you should be able to log in using the password for the specified user. Note that:
- The “-p” switch enables you to specify a custom SSH port to override the default “22”.
- Only users belonging to the device's administrators group can login via SSH.








 Copyright © 2026