- Joined
- Dec 29, 2021
- Messages
- 10
- Reaction score
- 0
Hi, Community.
I'm using an AWS-hosted 3CX system which has been working great with the soft phones / apps. Now we're trying to put dedicated VoIP phones in place. I'm having nothing but challenges trying to provision a Fanvil V2 IP Phone (much less set it up as an SBC). I want to document the issues as I see them, get some feedback on my scenario, and confirmation if I’ve discovered a bug or missed a configuration step.
I've been over the various documents regarding the provisioning IP phones:
My understanding of this scenario:
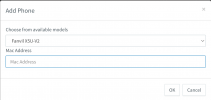
In the 3CX Management Console, I have configured a new user and specified an extension number. Under that User’s Phone Provisioning tab, I've added the phone by entering the Make / Model (Fanvil X5U-V2) along with its MAC address.
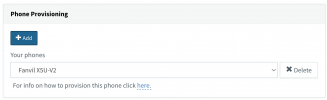
When you complete this, the Phone Provisioning section completes and provides a link “For info on how to provision this phone.”
For the X5U-V2, the link takes you to the How to Configure Fanvil X and XU Series article. In that article, Step 3 attempts to detail how to setup the IP Phone section of the Phone Provisioning tab in the User’s profile.
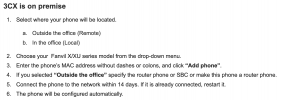
In this scenario, we would follow the “3CX is on premise” steps (because the “3CX is in the cloud” steps would not pertain to our self-hosted instance on AWS). Unfortunately, these steps create a fork in the road we cannot get past.
While these instructions are a little dated compared to the current version of the 3CX Management Console, you can interpret that the current “Provisioning Method” field is where you would “Select where your phone will be located” (per Step 1). The provided options in the field relate to the documentation as follows:
NOTE TO 3CX PERSONNEL: It would be very helpful if this Documentation was updated to match the actual selection options in the Provisioning Method field.
In our AWS self-hosted scenario, we SHOULD be selecting the “3CX SBC (remote)” option for Provisioning Method. At least, this is what the Documentation would seem to imply. Using this Provisioning Method, we see the following:
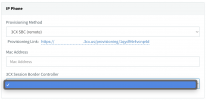
The MAC Address of the phone will already be filled-in from the earlier dialog in the Phone Provisioning section. We are also presented a field called 3CX Session Border Controller. This is a pull-down list, but there are no options to select. This seems to indicate we're to define an SBC elsewhere as a prior step, but that doesn't make sense. Per the Documentation, I expected to have an option presented to “make this phone a router phone” in this IP Phone section, but that's not available.
Because we cannot select an SBC from the pulldown menu, we need to make another selection in order to save the configuration (click “OK”). As a troubleshooting step, I have tried the selection of “Local LAN (in the office)” which does allow me to click “OK.”
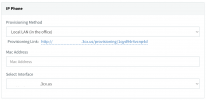
Selecting this option again presents the Mac Address field and a Select Interface field. Again, the MAC Address field provided is pre-populated from the earlier step. The Select Interface field is a pull-down list populated with the available network interfaces from your server. Presumably, you’ll want to select the appropriate interface for your phone to request provisioning information.
In the case of our AWS install, the Select Interface field offers two choices: The FQDN of the external-facing interface or the IP address of the internal-facing interface. These are both configured as part of the AWS EC2 instance we’re running for our server. In our case, I selected the FQDN of the external-facing interface.
While the Provisioning Method of “Local LAN (in the office)” is clearly not the appropriate method for provisioning the phone, it does have the effect of allowing a configuration to be downloaded to the phone from the AWS-hosted server (including Timezone, Date and Time, Web Page Password, etc.). Unfortunately, the phone is unable to establish a SIP connection without having an SBC defined, so that's a non-starter.
It seems to me we have a bug here. I could swear that I had previously seen an option to indicate whether the phone we’re adding to the User profile is a Router Phone. If it was there, it's now nowhere to be found. If this field was moved, I cannot find it. Again, the Documentation seems to indicate it should be an option in the IP Phone section when you select “3CX SBC (remote).”
Part of my purpose for this post was to document the disparity between the provided guidance and the actual interface in the 3CX Management Console. My other goal is to note a potential bug. I’d really appreciate a solution as this seems to be preventing me from specifying our Fanvil X5U-V2 as a router phone for our site.
Thanks,
- Dave
I'm using an AWS-hosted 3CX system which has been working great with the soft phones / apps. Now we're trying to put dedicated VoIP phones in place. I'm having nothing but challenges trying to provision a Fanvil V2 IP Phone (much less set it up as an SBC). I want to document the issues as I see them, get some feedback on my scenario, and confirmation if I’ve discovered a bug or missed a configuration step.
I've been over the various documents regarding the provisioning IP phones:
- Configuring IP Phones
- How to Configure Fanvil X and XU Series (last updated on 29th June 2023)
- Installing a 3CX SBC (Session Border Controller)
- How to factory reset a Fanvil IP Phone
My understanding of this scenario:
- While it is technically hosted in the cloud, the AWS installation is considered a "Self-Hosted" installation.
- Our office is considered a Remote Site in relation to the Self-Hosted installation on AWS.
- As a Remote Site, we need to have a Session Border Controller (SBC) to appropriately provision the SIP sessions.
- Configuring an IP Phone is done in the 3CX Management Console via the Users tab within the respective User's profile therein.
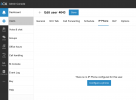
In the 3CX Management Console, I have configured a new user and specified an extension number. Under that User’s Phone Provisioning tab, I've added the phone by entering the Make / Model (Fanvil X5U-V2) along with its MAC address.
When you complete this, the Phone Provisioning section completes and provides a link “For info on how to provision this phone.”
For the X5U-V2, the link takes you to the How to Configure Fanvil X and XU Series article. In that article, Step 3 attempts to detail how to setup the IP Phone section of the Phone Provisioning tab in the User’s profile.
In this scenario, we would follow the “3CX is on premise” steps (because the “3CX is in the cloud” steps would not pertain to our self-hosted instance on AWS). Unfortunately, these steps create a fork in the road we cannot get past.
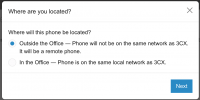
While these instructions are a little dated compared to the current version of the 3CX Management Console, you can interpret that the current “Provisioning Method” field is where you would “Select where your phone will be located” (per Step 1). The provided options in the field relate to the documentation as follows:
- The “Local LAN (in the office)” option is the same as “b. In the office (Local)” in the documentation
- The “3CX SBC (remote)” option is the same as “a. Outside the office (Remote)” in the documentation
NOTE TO 3CX PERSONNEL: It would be very helpful if this Documentation was updated to match the actual selection options in the Provisioning Method field.
In our AWS self-hosted scenario, we SHOULD be selecting the “3CX SBC (remote)” option for Provisioning Method. At least, this is what the Documentation would seem to imply. Using this Provisioning Method, we see the following:
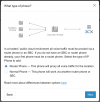
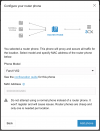
The MAC Address of the phone will already be filled-in from the earlier dialog in the Phone Provisioning section. We are also presented a field called 3CX Session Border Controller. This is a pull-down list, but there are no options to select. This seems to indicate we're to define an SBC elsewhere as a prior step, but that doesn't make sense. Per the Documentation, I expected to have an option presented to “make this phone a router phone” in this IP Phone section, but that's not available.
Because we cannot select an SBC from the pulldown menu, we need to make another selection in order to save the configuration (click “OK”). As a troubleshooting step, I have tried the selection of “Local LAN (in the office)” which does allow me to click “OK.”
Selecting this option again presents the Mac Address field and a Select Interface field. Again, the MAC Address field provided is pre-populated from the earlier step. The Select Interface field is a pull-down list populated with the available network interfaces from your server. Presumably, you’ll want to select the appropriate interface for your phone to request provisioning information.
In the case of our AWS install, the Select Interface field offers two choices: The FQDN of the external-facing interface or the IP address of the internal-facing interface. These are both configured as part of the AWS EC2 instance we’re running for our server. In our case, I selected the FQDN of the external-facing interface.
While the Provisioning Method of “Local LAN (in the office)” is clearly not the appropriate method for provisioning the phone, it does have the effect of allowing a configuration to be downloaded to the phone from the AWS-hosted server (including Timezone, Date and Time, Web Page Password, etc.). Unfortunately, the phone is unable to establish a SIP connection without having an SBC defined, so that's a non-starter.
It seems to me we have a bug here. I could swear that I had previously seen an option to indicate whether the phone we’re adding to the User profile is a Router Phone. If it was there, it's now nowhere to be found. If this field was moved, I cannot find it. Again, the Documentation seems to indicate it should be an option in the IP Phone section when you select “3CX SBC (remote).”
Part of my purpose for this post was to document the disparity between the provided guidance and the actual interface in the 3CX Management Console. My other goal is to note a potential bug. I’d really appreciate a solution as this seems to be preventing me from specifying our Fanvil X5U-V2 as a router phone for our site.
Thanks,
- Dave
Last edited: