V20 Beta for greater system options and flexibility.
V20 is progressing well with the first Beta available for download today. A lot of functionality has been added with the focus on 2FA and Phone provisioning. There are some specific requirements to take note of, all of which are outlined in full below. Read on to learn more.
Compared to the Preview, the following areas have been updated and new features added:
Phone Provisioning
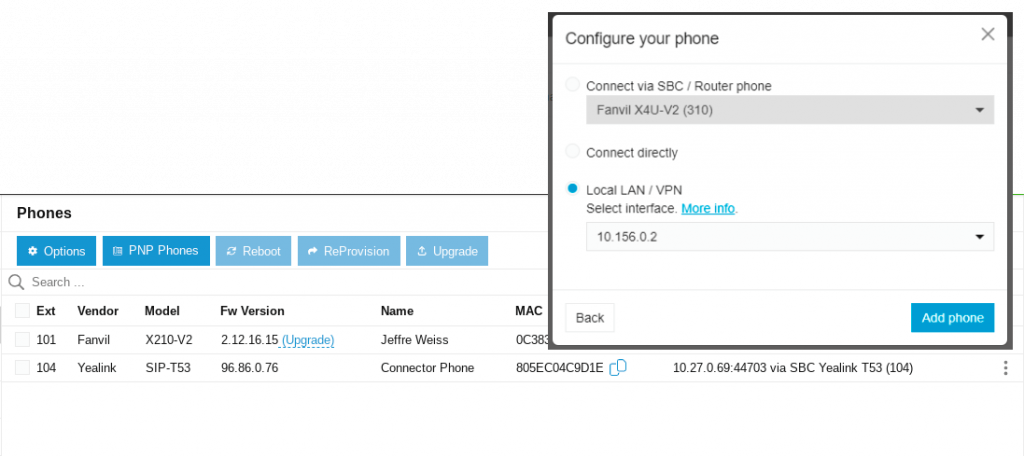 Phone provisioning has been completely revamped and now supports two main provisioning methods, RPS and PNP. The general logic is to configure the phone for the user first, specify the model and mac, after which the provisioning URL is created and sent to the RPS server. At this point you can plugin the phone and it will provision automatically. If you use RPS, it will connect to the RPS server and self configure.
If you prefer to use PNP and are on the local LAN or behind an SBC, the phone will show up under PNP phones in the Admin Console and allow you to assign the phone to an extension.
- Many provisioning features have been added
- Timezone - add to device both for IP & Dect
- Phone logo provisioning
- Note: More options coming in Beta 2.
Read the updated user guide on how to configure a phone.
2FA, SSO & User Creation
In this Beta we’ve greatly expanded the features available for user creation and configuration:
- Import & Export of Users now supports the old extended import format
- Web Client password requirements are more complex - requiring 1 special character
- Improved reset password mechanism
- Office 365 and Teams configuration indicator
- Google SSO configuration
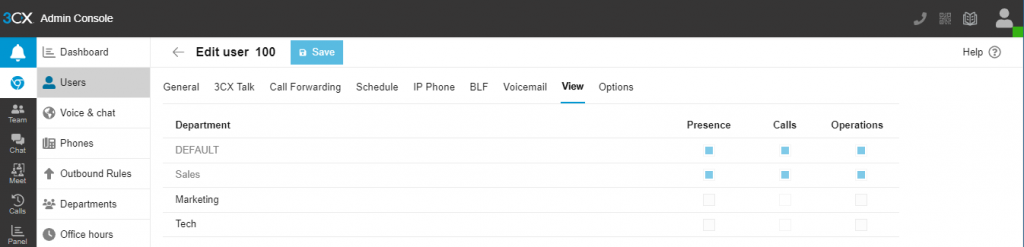
- Easily configure which calls of which departments a user can see
Trunks / Call Manager
Changes to VoIP provider configuration:
- Codec priority in Trunks
- Add Port via Template tag “Port” & “Advance”
- CDR
- Call Costs and Call Types And Purge
- Import/Export of provider templates
- Allow inbound calls & allow outbound calls
CFD - Call Flow Designer
You can now add/delete call flow designer scripts. V18 scripts are compatible with V20 and no script changes are required.
System
- Ability to edit the extension number of system extensions such as Queue, IVR and Ring Groups.
- In users>call forwarding we’ve added 2 call options for all profiles as follows:
- Call Forwarding Log Out from queues
- Accept calls from Ring Groups
- Updated System Dashboard with Recording Quota, Static or Dynamic IP notifications, Public IP, System Health and Install Type.
- Backup and restore and Failover screens improved.
- Added back existing bridges. You can not edit or create new bridges just existing keep working
- Support for sending Whatsapp, Facebook to Q/RG/IVR
- Configure logging level in Dashboard
- Ability to filter call handling types in voice and chat page
Requirements
- Split DNS required. Without split DNS, the apps will not work within the office and the Web Client will not notify for incoming calls.
- System owner required - you must indicate a system owner in v18 before upgrading.
- V18 Update 9 must be installed to upgrade.
- Specify a valid email for each extension.
- BETA 1 - Extension email must be unique and for now can be left empty. In the next update, leaving the email empty will disable Web Client access.
Machine Spec Requirements
- Machine must have 2 cores and 2 GB RAM.
- Upgrades on 1 core and/or 1 GB RAM machines will FAIL.
- Source list must not have been edited in any way. Upgrade will FAIL.
- Sufficient Disk Space is required.
Note: Please do not escalate things to Support until you have checked the four points listed above.
Get V20 Beta
If you’re already on V18, Update 9 - login to your Admin Console, go to “Updates” and click on “Upgrade”.
Note: This will upgrade your operating system to Debian 12 and will install Version 20 Beta.
Otherwise:
- Go to https://www.3cx.com/install/ (if you have an existing portal account, you can do it from there).
- Select 3CX Self Hosted / On Premise - PRO / ENT" and follow the steps.
- Select “Linux - Version 20” to get the ISO download link.
- Now download the configuration file or copy the link to the configuration file (step 3).
- Boot up the ISO and select either command line or web.
- Copy the file or paste the link to the configuration file.
- Login to the system!
Share your Thoughts
Let us know your thoughts in our dedicated Partner or Customer Forums.
Hit the follow button on our X and LinkedIn pages to stay-up-to date on further developments.